MyBatis技术小结

MyBatis简介

MyBatis本是Apache的一个开源项目iBatis,2010年这个项目由Apache Software Foundation迁移到了Google Code,并且改名为MyBatis。iBATIS一词来源于“internet”和“abatis”的组合,是一个基于Java的持久层框架。iBATIS提供的持久层框架包括SQL Maps和Data Access Objects(DAO)。MyBatis是iBatis的升级版,用法有很多的相似之处,但是MyBatis进行了重要的改进。

MyBatis是一款优秀的持久层框架,它支持定制化SQL、存储过程以及高级映射。MyBatis避免了几乎所有的JDBC代码和手动设置参数以及获取结果集。MyBatis可以使用简单的XML或注解来配置和映射原生信息,将接口和Java的POJOs(Plain Old Java Objects,普通的 Java对象)映射成数据库中的记录。

备注:Hibernate比较重,Mybatis比较轻,简单易用。

MyBatis的架构和原理

MyBatis的架构图如下:
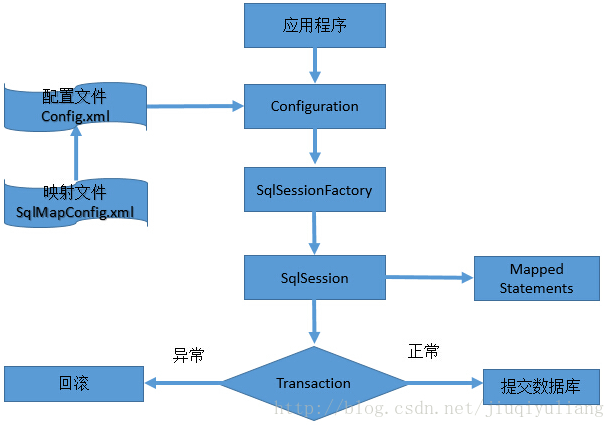
MyBatis应用程序根据XML配置文件创建SqlSessionFactory,SqlSessionFactory再根据配置,配置来源于两个地方,一处是配置文件,一处是Java代码的注解,获取一个SqlSession。SqlSession包含了执行sql所需要的所有方法,可以通过SqlSession实例直接运行映射的SQL语句,完成对数据的增删改查和事务提交等,用完之后关闭SqlSession。

MyBatis框架中的一些基础框架

SqlSessionFactoryBuilder
SqlSessionFactory
SqlSession()
Mapper

MyBatis使用

(1)引入Maven依赖

1
2
3
4
5
<dependency>
<groupId>org.mybatis</groupId>
<artifactId>mybatis</artifactId>
<version>x.x.x</version>
</dependency>

(2)编写mybatis-config.xml

1
2
3
4
5
6
7
8
9
10
11
12
13
14
15
16
17
18
19
20
<?xml version="1.0" encoding="UTF-8" ?>
<!DOCTYPE configuration
PUBLIC "-//mybatis.org//DTD Config 3.0//EN"
"http://mybatis.org/dtd/mybatis-3-config.dtd">
<configuration>
<environments default="development">
<environment id="development">
<transactionManager type="JDBC"/>
<dataSource type="POOLED">
<property name="driver" value="${driver}"/>
<property name="url" value="${url}"/>
<property name="username" value="${username}"/>
<property name="password" value="${password}"/>
</dataSource>
</environment>
</environments>
<mappers>
<mapper resource="com/bat/BlogMapper.xml"/>
</mappers>
</configuration>

(3)编写实体类

比如实体类Blog,如下:

1
2
3
4
5
6
7
8
9
10
11
12
13
14
15
16
17
18
19
20
21
22
23
24
25
26
27
28
29
30
31
32
33
34
35
public class Blog {
private int id;
private String title;
private String content;

public Blog(int id, String title, String content) {
this.id = id;
this.title = title;
this.content = content;
}

public int getId() {
return id;
}

public void setId(int id) {
this.id = id;
}

public String getTitle() {
return title;
}

public void setTitle(String title) {
this.title = title;
}

public String getContent() {
return content;
}

public void setContent(String content) {
this.content = content;
}
}

备注:在MyBatis中定义实体类时,好像就不需要JPA中的@Entity/@Table/@Column等等注解,待确认一下哦??

(4)编写SQL到实体类的映射配置Mapper文件

比如BlogMapper.xml文件内容如下:

1
2
3
4
5
6
7
8
9
<?xml version="1.0" encoding="UTF-8" ?>
<!DOCTYPE mapper
PUBLIC "-//mybatis.org//DTD Mapper 3.0//EN"
"http://mybatis.org/dtd/mybatis-3-mapper.dtd">
<mapper namespace="com.bat.BlogMapper">
<select id="selectBlog" resultType="Blog">
select * from Blog where id = #{id}
</select>
</mapper>

备注:这里id="selectBlog"是给这条SQL语句命个名字,然后就可以在代码中调用,从而执行这条SQL语句。

(5)编写Mapper接口

如BlogMpper.java的文件内容如下:

1
2
3
public interface BlogMapper {
Blog selectBlog(int id);
}

需要特别注意的是,MyBatis也支持使用注解代替xml Mapper文件方法,若定义Mapper接口时,在接口的方法使用MyBatis的一些注解来定义SQL语句,则第(4)步骤定义xml Mapper配置文件可以省略掉,举例如下:

1
2
3
4
public interface BlogMapper {
@Select("SELECT * FROM blog WHERE id = #{id}")
Blog selectBlog(int id);
}

(6)生成SqlSessionFactory

1
2
3
String resource = "org/mybatis/mybatis-config.xml";
InputStream inputStream = Resources.getResourceAsStream(resource);
SqlSessionFactory sqlSessionFactory = new SqlSessionFactoryBuilder().build(inputStream);

(7)获取数据库SqlSession并进行CRUD操作

1
2
3
4
try (SqlSession session = sqlSessionFactory.openSession()) {
BlogMapper mapper = session.getMapper(BlogMapper.class);
Blog blog = mapper.selectBlog(101);
}

Mapper接口层向Mapper XML文件中传递参数(parameterType | parameterMap)

parameterType和parameterMap,是执行SQL时,往SQL中注入的参数类型。其中parameterMap不常用。parameterType与Service层传入Mapper层的参数基本一致,而parameterMap负责将JavaBean的属性映射成statement的参数。

MyBatis中传参一般可以区分为两类,即基本数据类型(int、string、long等)以及复杂数据类型(JavaBean、Integer、Map等)。Mapper接口层向Mapper XML文件中传递参数有如下几种方式:

使用@Param注解

Mapper接口如下:

1
int addMoney(@Param("id") int id, @Param("money") int money);

Mapper XML中使用如下:

1
2
3
<update id="addMoney" parameterType="java.util.Map">
update money set money=money+#{money} where id=#{id}
</update>

备注:若使用了@Param注解,则在@Param中定义的id,和Mapper XML中#{id}的id必须是定义是对应起来的。

Mapper接口层是单参数传递

Mapper接口如下:

1
2
MoneyPo findById(int id);
MoneyPo findByIdV2(int id);

Mapper XML中使用如下:

1
2
3
4
5
6
7
8
9
10
<select id="findById" parameterType="java.lang.Integer" resultMap="BaseResultMap">
select
<include refid="money_po"/>
from money where id=#{id}
</select>
<select id="findByIdV2" parameterType="java.lang.Integer" resultMap="BaseResultMap">
select
<include refid="money_po"/>
from money where id=#{dd}
</select>

重点看一下上面的findByIdV2,上面的Mapper XML中传参使用的是#{dd},和Mapper接口中的参数名并不相同,但是最终的结果却没有什么区别,是没有问题的。

Mapper接口层是多参数传递

Mapper接口如下:

1
List<MoneyPo> findByNameAndMoney(String name, Integer money);

Mapper XML中使用如下:

1
2
3
4
5
6
7
8
9
10
11
<select id="findByNameAndMoney" resultMap="BaseResultMap">
select
<include refid="money_po"/>
from money where name=#{arg0} and money=#{arg1}
</select>
<!-- 或者 -->
<select id="findByNameAndMoney" resultMap="BaseResultMap">
select
<include refid="money_po"/>
from money where name=#{param1} and money=#{param2}
</select>

注意上面的Mapper XML中,两种传参都是可以的,当然不建议使用这种方式来传参,因为非常不直观,对于后续的维护很不优雅。

Mapper接口层传递Map参数

如果参数类型并不是简单类型,当是Map类型时,在Mapper XML文件中使用参数时,可以直接使用Map中对应的key来指代。

Mapper接口如下:

1
List<MoneyPo> findByMap(Map<String, Object> map);

Mapper XML中使用如下:

1
2
3
4
5
6
7
8
9
10
11
12
13
14
15
16
<select id="findByMap" resultMap="BaseResultMap">
select
<include refid="money_po"/>
from money
<trim prefix="WHERE" prefixOverrides="AND | OR">
<if test="id != null">
id = #{id}
</if>
<if test="name != null">
AND name=#{name}
</if>
<if test="money != null">
AND money=#{money}
</if>
</trim>
</select>

Mapper接口层传递POJO参数

另外一种常见的case是传参为简单的实体对象,这个时候Mapper XML中的参数也可以直接使用对象的fieldName来指代,和Map的使用方式差不多。

Mapper接口如下:

1
List<MoneyPo> findByPo(MoneyPo po);

Mapper XML中使用如下:

1
2
3
4
5
6
7
8
9
10
11
12
13
14
15
16
<select id="findByPo" parameterType="com.git.hui.boot.mybatis.entity.MoneyPo" resultMap="BaseResultMap">
select
<include refid="money_po"/>
from money
<trim prefix="WHERE" prefixOverrides="AND | OR">
<if test="id != null">
id = #{id}
</if>
<if test="name != null">
AND name=#{name}
</if>
<if test="money != null">
AND money=#{money}
</if>
</trim>
</select>

Mapper接口层传递的是简单参数和Map参数

当参数有多个,其中部分为简单类型,部分为Map,这样的场景下,简单类型遵循上面的规则,Map参数的传参,使用前缀 + “.” + key的方式。

Mapper接口如下:

1
2
List<MoneyPo> findByIdOrCondition(@Param("id") int id, @Param("map") Map<String, Object> map);
List<MoneyPo> findByIdOrConditionV2(int id, Map<String, Object> map);

Mapper XML中使用如下:

1
2
3
4
5
6
<select id="findByIdOrCondition" resultMap="BaseResultMap">
select <include refid="money_po"/> from money where id = #{id} or `name`=#{map.name}
</select>
<select id="findByIdOrConditionV2" resultMap="BaseResultMap">
select <include refid="money_po"/> from money where id = #{param1} or `name`=#{param2.name}
</select>

参数传递中parameterMap的使用

上面的几种案例中,都可以不指定parameterType,当然也可以指定,按需指定。当我们希望针对某些查询条件做一些TypeHandler时,除了在#{}中指定之外,借助parameterMap也是一个好的选择。

Mapper接口如下:

1
List<MoneyPo> queryByNameV2(Map<String, Object> params);

对应的Mapper XML如下,这里主要是为了演示这个使用姿势,StrTypeHandler是一个自定义的类型抓换,不管传参什么类型,都转成String。

Mapper XML中使用如下:

1
2
3
4
5
6
<parameterMap id="queryMap" type="java.util.Map”> 
<parameter property="name" typeHandler="com.git.hui.boot.mybatis.handler.StrTypeHandler"/>
</parameterMap>
<select id="queryByNameV2" parameterMap="queryMap" resultMap="BaseResultMap”>
select * from money where `name` = #{name}
</select>

Mapper XML文件向Mapper接口层中返回结果参数(resultType | resultMap)

resultType和resultMap,是执行完SQL后,DB返回的内容的类型。resultType是直接表示返回类型的,而resultMap则是对外部resultMap的引用,即需要在Mapper.xml文件中定义resultMap。

resultType和resultMap功能类似 ,都是返回对象信息 ,但是resultMap要更强大一些 ,可自定义。因为resultMap要配置一下,表和类的一一对应关系,所以说就算你的字段名和你的实体类的属性名不一样也没关系,都会给你映射出来,但是,resultType就比较鸡肋了,必须字段名一样,比如说 cId和c_id 这种的都不能映射。

resultType

Mapper接口如下:

1
2
public List<UserCustom> findUserList(UserQueryVo userQueryVo) throws Exception;
public int findUserCount(UserQueryVo userQueryVo) throws Exception;

Mapper XML中内容如下:

1
2
3
4
5
6
7
<select id="findUserList" parameterType="cn.edu.hpu.mybatis.PO.UserQueryVo" 
resultType="cn.edu.hpu.mybatis.PO.UserCustom">
select * from user where user.sex=#{userCustom.sex} and user.username like '%${userCustom.username}%'
</select>
<select id="findUserCount" parameterType="cn.edu.hpu.mybatis.PO.UserQueryVo" resultType="int">
select count(*) from user where user.sex=#{userCustom.sex} and user.username like '%${userCustom.username}%'
</select>

resultMap

Mapper接口如下:

1
public User findUserByResultMap(int id) throws Exception;

Mapper XML中内容如下:

1
2
3
4
5
6
7
8
<resultMap type="user" id="userResultMap">
<id column="_id" property="id"/>
<result column="_username" property="username"/>
</resultMap>
<!-- resultMap=“userResultMap”中的userResultMap,是在resultMap标签中定义的id是一样的 -->
<select id="findUserByResultMap" parameterType="int" resultMap="userResultMap">
select id _id,username _username from user where id=#{value}
</select>

MyBatis中的一些高级用法

if标签

if标签可用在许多类型的SQL语句中,我们以查询为例。首先看一个很普通的查询:

1
2
3
<select id="getStudentListLikeName" parameterType="StudentEntity" resultMap="studentResultMap">
SELECT * from STUDENT_TBL ST WHERE ST.STUDENT_NAME LIKE CONCAT(CONCAT('%', #{studentName}),'%')
</select>

但是此时如果studentName为null,此语句很可能报错或查询结果为空。此时我们使用if动态SQL语句先进行判断,如果值为null或等于空字符串,我们就不进行此条件的判断,增加灵活性。参数为实体类StudentEntity。将实体类中所有的属性均进行判断,如果不为空则执行判断条件。

1
2
3
4
5
6
7
8
9
10
11
12
13
14
15
16
17
18
19
20
21
22
23
24
25
26
27
28
29
30
31
32
33
34
35
<select id="getStudentList_if" resultMap="resultMap_studentEntity" parameterType="liming.student.manager.data.model.StudentEntity">
SELECT ST.STUDENT_ID,
ST.STUDENT_NAME,
ST.STUDENT_SEX,
ST.STUDENT_BIRTHDAY,
ST.STUDENT_PHOTO,
ST.CLASS_ID,
ST.PLACE_ID
FROM STUDENT_TBL ST
WHERE
<if test="studentName != null ">
ST.STUDENT_NAME LIKE CONCAT(CONCAT('%', #{studentName, jdbcType=VARCHAR}),'%')
</if>
<if test="studentSex != null and studentSex != '' ">
AND ST.STUDENT_SEX = #{studentSex, jdbcType=INTEGER}
</if>
<if test="studentBirthday != null ">
AND ST.STUDENT_BIRTHDAY = #{studentBirthday, jdbcType=DATE}
</if>
<if test="classId != null and classId!= '' ">
AND ST.CLASS_ID = #{classId, jdbcType=VARCHAR}
</if>
<if test="classEntity != null and classEntity.classId !=null and classEntity.classId !=' ' ">
AND ST.CLASS_ID = #{classEntity.classId, jdbcType=VARCHAR}
</if>
<if test="placeId != null and placeId != '' ">
AND ST.PLACE_ID = #{placeId, jdbcType=VARCHAR}
</if>
<if test="placeEntity != null and placeEntity.placeId != null and placeEntity.placeId != '' ">
AND ST.PLACE_ID = #{placeEntity.placeId, jdbcType=VARCHAR}
</if>
<if test="studentId != null and studentId != '' ">
AND ST.STUDENT_ID = #{studentId, jdbcType=VARCHAR}
</if>
</select>

if + where标签

在上面例子中,参数studentName为null,将不会进行STUDENT_NAME列的判断,则会直接导“WHERE AND”关键字多余的错误SQL。这时我们可以使用where动态语句来解决。这个“where”标签会知道如果它包含的标签中有返回值的话,它就插入一个”where“。此外,如果标签返回的内容是以AND或OR开头的,则它会剔除掉。上面例子修改为:

1
2
3
4
5
6
7
8
9
10
11
12
13
14
15
16
17
18
19
20
21
22
23
24
25
26
27
28
29
30
31
32
33
34
35
36
<select id="getStudentList_whereIf" resultMap="resultMap_studentEntity" parameterType="liming.student.manager.data.model.StudentEntity">
SELECT ST.STUDENT_ID,
ST.STUDENT_NAME,
ST.STUDENT_SEX,
ST.STUDENT_BIRTHDAY,
ST.STUDENT_PHOTO,
ST.CLASS_ID,
ST.PLACE_ID
FROM STUDENT_TBL ST
<where>
<if test="studentName != null ">
ST.STUDENT_NAME LIKE CONCAT(CONCAT('%', #{studentName, jdbcType=VARCHAR}),'%')
</if>
<if test="studentSex != null and studentSex != '' ">
AND ST.STUDENT_SEX = #{studentSex, jdbcType=INTEGER}
</if>
<if test="studentBirthday != null ">
AND ST.STUDENT_BIRTHDAY = #{studentBirthday, jdbcType=DATE}
</if>
<if test="classId != null and classId!= '' ">
AND ST.CLASS_ID = #{classId, jdbcType=VARCHAR}
</if>
<if test="classEntity != null and classEntity.classId !=null and classEntity.classId !=' ' ">
AND ST.CLASS_ID = #{classEntity.classId, jdbcType=VARCHAR}
</if>
<if test="placeId != null and placeId != '' ">
AND ST.PLACE_ID = #{placeId, jdbcType=VARCHAR}
</if>
<if test="placeEntity != null and placeEntity.placeId != null and placeEntity.placeId != '' ">
AND ST.PLACE_ID = #{placeEntity.placeId, jdbcType=VARCHAR}
</if>
<if test="studentId != null and studentId != '' ">
AND ST.STUDENT_ID = #{studentId, jdbcType=VARCHAR}
</if>
</where>
</select>

if + set标签

当update语句中没有使用if标签时,如果有一个参数为null,都会导致错误。当在update语句中使用if标签时,如果前面的if没有执行,则或导致逗号多余错误。使用set标签可以将动态的配置SET关键字,和剔除追加到条件末尾的任何不相关的逗号。使用if+set标签修改后,如果某项为null则不进行更新,而是保持数据库原值。如下示例:

1
2
3
4
5
6
7
8
9
10
11
12
13
14
15
16
17
18
19
20
21
22
23
24
<update id="updateStudent_if_set" parameterType="liming.student.manager.data.model.StudentEntity">
UPDATE STUDENT_TBL
<set>
<if test="studentName != null and studentName != '' ">
STUDENT_TBL.STUDENT_NAME = #{studentName},
</if>
<if test="studentSex != null and studentSex != '' ">
STUDENT_TBL.STUDENT_SEX = #{studentSex},
</if>
<if test="studentBirthday != null ">
STUDENT_TBL.STUDENT_BIRTHDAY = #{studentBirthday},
</if>
<if test="studentPhoto != null ">
STUDENT_TBL.STUDENT_PHOTO = #{studentPhoto, javaType=byte[], jdbcType=BLOB, typeHandler=org.apache.ibatis.type.BlobTypeHandler},
</if>
<if test="classId != '' ">
STUDENT_TBL.CLASS_ID = #{classId}
</if>
<if test="placeId != '' ">
STUDENT_TBL.PLACE_ID = #{placeId}
</if>
</set>
WHERE STUDENT_TBL.STUDENT_ID = #{studentId};
</update>

if + trim代替where/set标签

trim是更灵活的去处多余关键字的标签,他可以实践where和set的效果。

trim代替where示例如下:

1
2
3
4
5
6
7
8
9
10
11
12
13
14
15
16
17
18
19
20
21
22
23
24
25
26
27
28
29
30
31
32
33
34
35
36
<select id="getStudentList_if_trim" resultMap="resultMap_studentEntity">
SELECT ST.STUDENT_ID,
ST.STUDENT_NAME,
ST.STUDENT_SEX,
ST.STUDENT_BIRTHDAY,
ST.STUDENT_PHOTO,
ST.CLASS_ID,
ST.PLACE_ID
FROM STUDENT_TBL ST
<trim prefix="WHERE" prefixOverrides="AND|OR">
<if test="studentName !=null ">
ST.STUDENT_NAME LIKE CONCAT(CONCAT('%', #{studentName, jdbcType=VARCHAR}),'%')
</if>
<if test="studentSex != null and studentSex != '' ">
AND ST.STUDENT_SEX = #{studentSex, jdbcType=INTEGER}
</if>
<if test="studentBirthday != null ">
AND ST.STUDENT_BIRTHDAY = #{studentBirthday, jdbcType=DATE}
</if>
<if test="classId != null and classId!= '' ">
AND ST.CLASS_ID = #{classId, jdbcType=VARCHAR}
</if>
<if test="classEntity != null and classEntity.classId !=null and classEntity.classId !=' ' ">
AND ST.CLASS_ID = #{classEntity.classId, jdbcType=VARCHAR}
</if>
<if test="placeId != null and placeId != '' ">
AND ST.PLACE_ID = #{placeId, jdbcType=VARCHAR}
</if>
<if test="placeEntity != null and placeEntity.placeId != null and placeEntity.placeId != '' ">
AND ST.PLACE_ID = #{placeEntity.placeId, jdbcType=VARCHAR}
</if>
<if test="studentId != null and studentId != '' ">
AND ST.STUDENT_ID = #{studentId, jdbcType=VARCHAR}
</if>
</trim>
</select>

trim代替set示例如下:

1
2
3
4
5
6
7
8
9
10
11
12
13
14
15
16
17
18
19
20
21
22
23
24
<update id="updateStudent_if_trim" parameterType="liming.student.manager.data.model.StudentEntity">
UPDATE STUDENT_TBL
<trim prefix="SET" suffixOverrides=",">
<if test="studentName != null and studentName != '' ">
STUDENT_TBL.STUDENT_NAME = #{studentName},
</if>
<if test="studentSex != null and studentSex != '' ">
STUDENT_TBL.STUDENT_SEX = #{studentSex},
</if>
<if test="studentBirthday != null ">
STUDENT_TBL.STUDENT_BIRTHDAY = #{studentBirthday},
</if>
<if test="studentPhoto != null ">
STUDENT_TBL.STUDENT_PHOTO = #{studentPhoto, javaType=byte[], jdbcType=BLOB, typeHandler=org.apache.ibatis.type.BlobTypeHandler},
</if>
<if test="classId != '' ">
STUDENT_TBL.CLASS_ID = #{classId},
</if>
<if test="placeId != '' ">
STUDENT_TBL.PLACE_ID = #{placeId}
</if>
</trim>
WHERE STUDENT_TBL.STUDENT_ID = #{studentId}
</update>

foreach

对于动态SQL非常必须的,主是要迭代一个集合,通常是用于IN条件。List实例将使用“list”做为键,数组实例以“array”做为键。foreach元素是非常强大的,它允许你指定一个集合,声明集合项和索引变量,它们可以用在元素体内。它也允许你指定开放和关闭的字符串,在迭代之间放置分隔符。这个元素是很智能的,它不会偶然地附加多余的分隔符。

注意:你可以传递一个List实例或者数组作为参数对象传给MyBatis。当你这么做的时候,MyBatis会自动将它包装在一个Map中,用名称在作为键。List实例将会以“list”作为键,而数组实例将会以“array”作为键。foreach元素的属性主要有item,index,collection,open,separator,close。

item:集合中元素迭代时的别名,
index:集合中元素迭代时的索引
open:常用语where语句中,表示以什么开始,比如以'('开始
separator:表示在每次进行迭代时的分隔符,
close 常用语where语句中,表示以什么结束

举例来说:

1
public List<Entity> queryById(List<String> userids);
1
2
3
4
5
6
<select id="queryById" resultMap="BaseReslutMap" >
select * FROM entity where id in
<foreach collection="userids" item="userid" index="index" open="(" separator="," close=")">
#{userid}
</foreach>
</select>

concat

1
2
3
4
5
6
7
8
<select id="queryById" resultMap="BascResultMap" parameterType="entity">
SELECT * from entity
<where>
<if test="name!=null">
name like concat('%',concat(#{name},'%'))
</if>
</where>
</select>

choose-when-otherwise

choose标签是按顺序判断其内部when标签中的test条件出否成立,如果有一个成立,则choose结束。当choose中所有when的条件都不满则时,则执行otherwise中的SQL。类似于Java的switch语句,choose为switch,when为case,otherwise则为default。

例如下面例子,同样把所有可以限制的条件都写上,方面使用。choose会从上到下选择一个when标签的test为true的SQL执行。安全考虑,我们使用where将choose包起来,放置关键字多于错误。

1
2
3
4
5
6
7
8
9
10
11
12
13
14
15
16
17
18
<select id="getUserList_choose" resultMap="resultMap_user" parameterType="com.yiibai.pojo.User">
SELECT * FROM User u
<where>
<choose>
<when test="username !=null ">
u.username LIKE CONCAT(CONCAT('%', #{username, jdbcType=VARCHAR}),'%')
</when >
<when test="sex != null and sex != '' ">
AND u.sex = #{sex, jdbcType=INTEGER}
</when >
<when test="birthday != null ">
AND u.birthday = #{birthday, jdbcType=DATE}
</when >
<otherwise>
</otherwise>
</choose>
</where>
</select>

sql标签

sql片段标签,通过该标签可定义能复用的sql语句片段,在执行sql语句标签中直接引用即可。这样既可以提高编码效率,还能有效简化代码,提高可读性。使用sql标签时,需要配置的属性:id="xxxx",表示需要改sql语句片段的唯一标识。通过标签引用,refid="xxxx"中的值指向需要引用的中的id="xxxx"属性.

1
2
3
4
5
6
7
8
9
10
11
12
<sql id="orderAndItem">
o.order_id,o.cid,o.address,o.create_date,o.orderitem_id,i.orderitem_id,i.product_id,i.count
</sql>

<select id="findOrderAndItemsByOid" parameterType="java.lang.String" resultMap="BaseResultMap">
select
<!--引用sql片段-->
<include refid="orderAndItem" />
from ordertable o
join orderitem i on o.orderitem_id = i.orderitem_id
where o.order_id = #{orderId}
</select>

MyBatis中#{}${}的联系和区别

MyBatis中使用ParameterType向SQL语句传参,在SQL语句中引用这些参数的时候,有两种方式,即#{parameterName}${parameterName}两种方式。

使用#{parameterName}方式引用参数的时候,MyBatis将传入的数据当成一个字符串,会对传入的变量自动加一个单引号。如user_id = #{userId},如果传入的值是111,那么解析成SQL时的值为user_id = '111',如果传入的值是id,则解析成的SQL为user_id = 'id'

使用${parameterName}引用参数时,不做任何处理,直接将值拼接在SQL语句中。如user_id = ${userId},如果传入的值是111,那么解析成SQL时的值为user_id = 111,如果传入的值是id,则解析成的SQL为user_id = id

#{parameterName}的方式引用参数,MyBatis会先对SQL语句进行预编译,然后再引用值,能够有效防止SQL注入,提高安全性。${parameterName}的方式引用参数,先取值拼接到SQL语句中,再进行预编译。

在实际开发中,推荐使用#{parameterName}的方式。

MyBatis优势

相对于JPA/Hibernate来说,MyBatis主要优势有:

SQL语句可以自由控制,更灵活,性能较高
SQL与代码分离,易于阅读和维护
提供XML标签,支持编写动态SQL语句

相对于MyBatis来说,JPA/Hibernate主要优势有:

JPA移植性比较好(JPQL),若换了底层数据库,不用修改代码,只需修改一些数据库的配置信息即可
提供了更多的CRUD方法,开发效率高
对象化程度更高

学习资料参考于:
http://www.mybatis.org/mybatis-3/zh/index.html
https://juejin.cn/post/7027444875276582919
https://mp.weixin.qq.com/s/rSmO9B0Kjhhzc4ywo4u1og
https://spring.hhui.top/spring-blog/2021/09/24/210924-SpringBoot%E7%B3%BB%E5%88%97Mybatis%E4%B9%8B%E5%8F%82%E6%95%B0%E4%BC%A0%E9%80%92%E7%9A%84%E5%87%A0%E7%A7%8D%E5%A7%BF%E5%8A%BF/